DPR Forum

Welcome to the Friendly Aisles!
DPRF is a photography forum with people from all over the world freely sharing their knowledge and love of photography. Everybody is welcome, from beginners to the experienced professional. Whether it is Medium Format, fullframe, APS-C, MFT or smaller formats. Digital or film. DPRF is a forum for everybody and for every format.
Enjoy this modern, easy to use software. Look also at our Reviews & Gallery!

Removing Dust and Lens Vignettes in Software

Steaphany

Well-Known Member
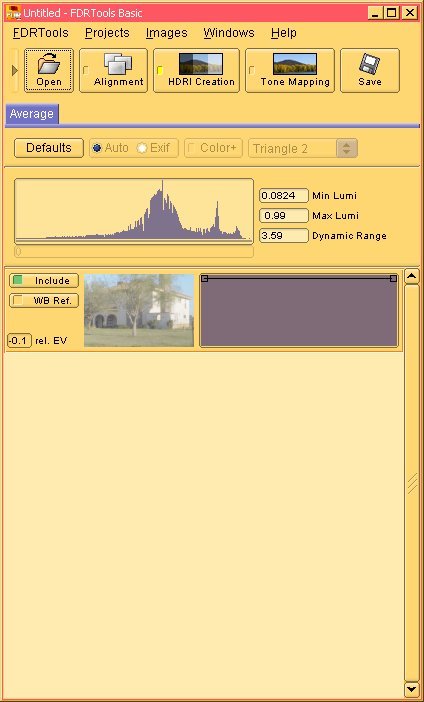
I'm going to provide a nicely detailed tutorial on how you can eliminate or compensate for imager dust and optical vignetting from an image. For my source images, I will use files from my last shoot through my pinhole lens. Since the light from a pinhole has virtually a single path to each imager photosite, the effects of dust on the imager are at their worst, so this will better demonstrate the effectiveness of this technique.

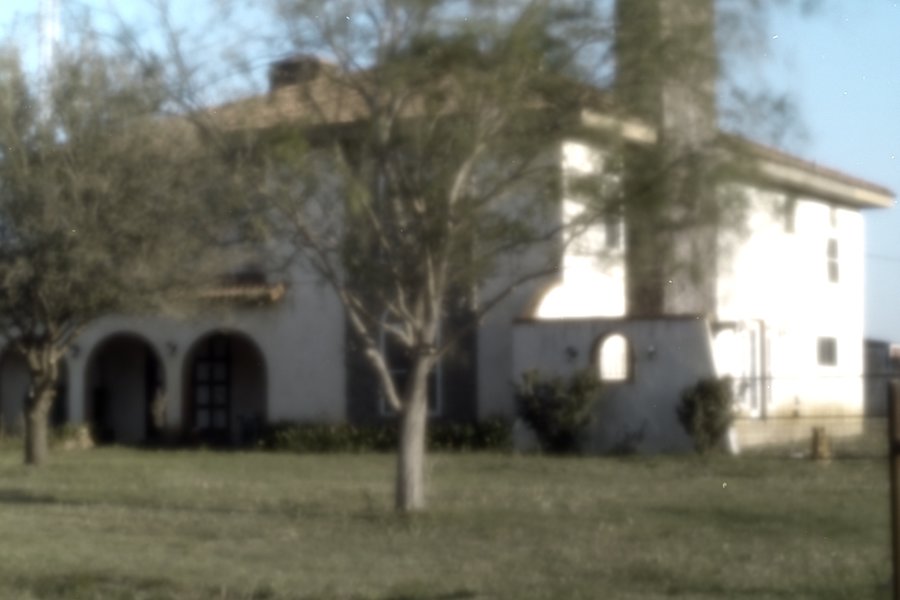
Here is the source image which I'll be referring to as the Light Frame:

View attachment 1435

Since a pinhole has no focus or aperture adjustment, the only controls are the image file format, shutter speed, ISO, and white balance, for this photo, 2640x1760 RAW, 2 Seconds, 100, Day Light.

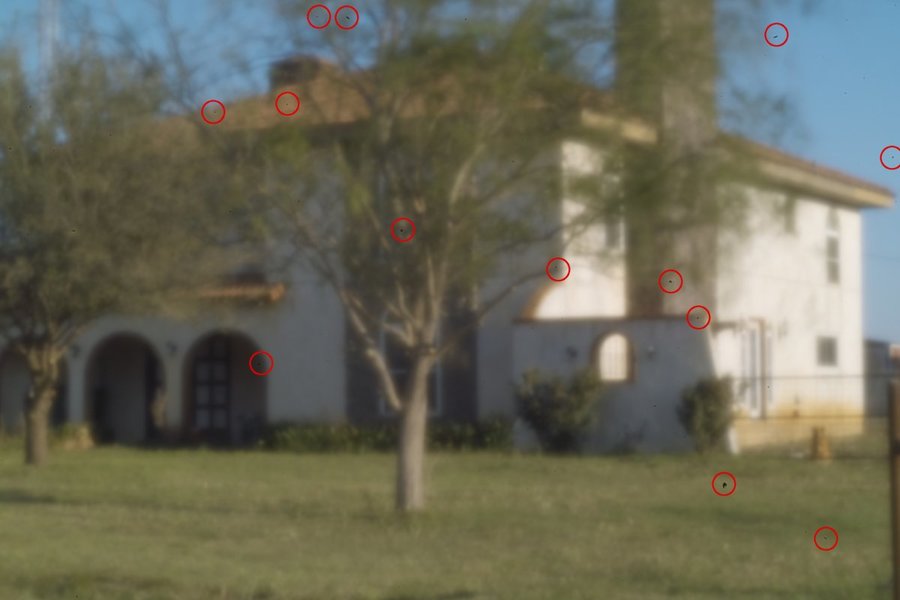
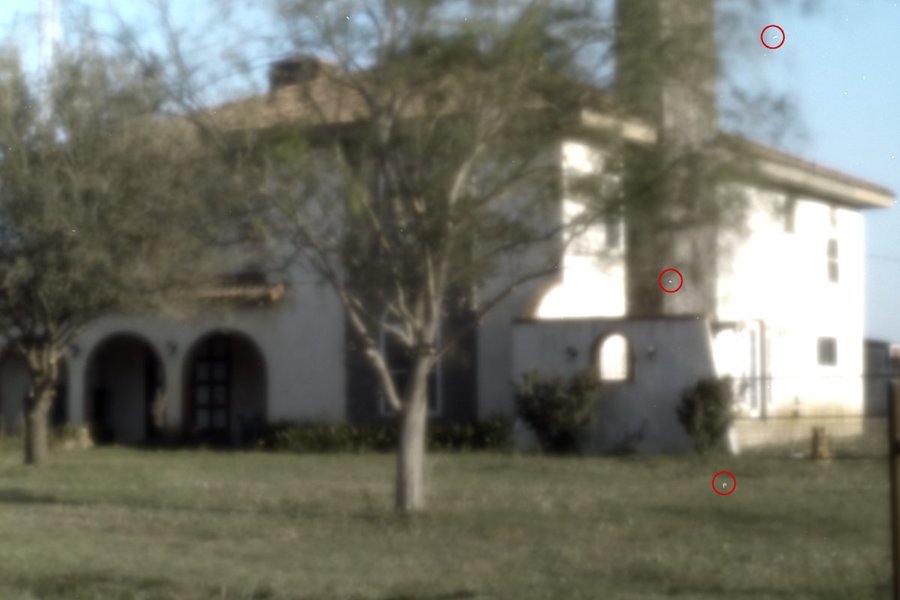
The imager dust is obvious, but I visually scanned the image was found these:

View attachment 1436

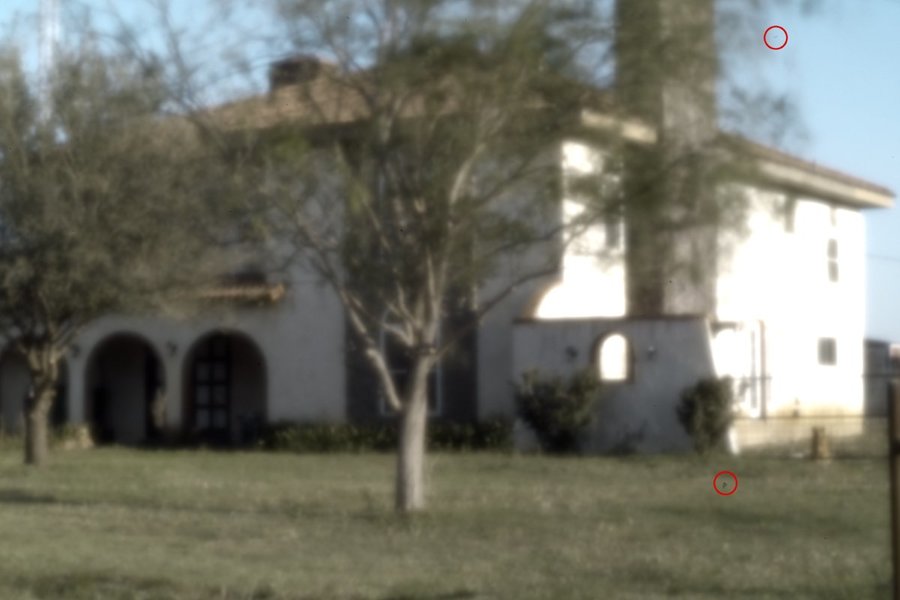
Right after the above shot, I aimed my tripod mounted SD14 up towards a pure smooth blue sky and this is my Flat Frame:

View attachment 1437

The imager dust is far more evident in the Flat Frame with it's smooth background:

View attachment 1438

I can see that there is a slight gradation in the blue of the sky, ideally, even this should be minimized, but it was still sufficient when considering that it was shot with the Sun low in the sky and there were clouds to the West where the sky would normally be smoother.

Step 1:

In SPP, open the Light Frame and make your usual image adjustments. Do not perform any image size or cropping at this time.

Step 2:

Before saving the file, save your adjustment settings, they will be needed later to process the Flat Frame.

Step 3:

Save your adjusted Light Frame image as a 16 Bit TIF file.

Step 4:

Open the Flat Frame and apply the saved adjustments from your Light Frame session.

Step 5:

Then shift the Saturation all the way to the left, so the Flat Frame is now monochrome:

View attachment 1439

Step 6:

Save your adjusted monochrome Flat Frame image as a 16 Bit TIF file.

<To be continued in another post>
 

Attachments

  • SDIM5186s.jpg
    EXIF
    SDIM5186s.jpg
    351.8 KB · Views: 3
  • SDIM5186sDust.jpg
    EXIF
    SDIM5186sDust.jpg
    73.9 KB · Views: 5
  • SDIM5188s.jpg
    EXIF
    SDIM5188s.jpg
    301.4 KB · Views: 3
  • SDIM5188sDust.jpg
    EXIF
    SDIM5188sDust.jpg
    33.7 KB · Views: 3
  • SDIM5188ms.jpg
    EXIF
    SDIM5188ms.jpg
    182.7 KB · Views: 2
Step 7:

Open DeepSkyStacker

View attachment 1441

Step 8:

Click on "Open Picture Files..." to load the 16 Bit TIF Light Frame file

View attachment 1442

Step 9:

Click on "Flat Files..." to load the 16 Bit TIF monochrome Flat Frame file

View attachment 1443

Step 10:

Click on "Check All" to ensure DSS has something to do

View attachment 1444

Step 11:

Click on "Stack Checked Pictures"

View attachment 1445

DSS will display a confirmation window and click on OK:

View attachment 1446

<To be continued in another post>
 

Attachments

  • stacksteps.jpg
    EXIF
    stacksteps.jpg
    49.8 KB · Views: 5
  • dssscpsmall.jpg
    EXIF
    dssscpsmall.jpg
    157.5 KB · Views: 4
  • dsscasmall.jpg
    EXIF
    dsscasmall.jpg
    157.5 KB · Views: 4
  • dssoffsmall.jpg
    EXIF
    dssoffsmall.jpg
    157.6 KB · Views: 2
  • dssofsmall.jpg
    EXIF
    dssofsmall.jpg
    157.5 KB · Views: 3
  • dsssmall.jpg
    EXIF
    dsssmall.jpg
    157 KB · Views: 4
DSS will step through a succession of progress windows and watch for it "Saving Final image .../Autosave.tif"

View attachment 1447

DSS will add a number to the Autosave.tif file name, Autosave001.tif Autosave003.tif Autosave003.tif... when asked to process other files from the same source folder, so you do not have to worry about loosing any work.

When completed, DSS will give you a WTF moment:

View attachment 1448

Do not worry, DSS simply opened the newly created Autosave.tif and applied it's default idea for RGB/K Levels, Luminance, and Saturation. I have still to figure out how these controls work and I am not comfortable with how they alter the image. Give them a try if you wish.

At this point, you can exit DSS. Since there is nothing on the DSS window to Quit or Exit, just click the upper right window close icon. DSS will ask if you want to save anything, just answer no since the Autosave.tif has already been saved.

Step 8:

Here is another surprise, DSS has taken two 16 bit TIF files and created a single 32 bit TIF file. For me, Photoshop chokes on it and Irfanview can't even call it up in the thumbnail view. I use Full Dynamic Range Tools Basic, which is their freeware version, to open the DSS Autosave.tif and then save it as a reduced 16 bit TIF:

View attachment 1449

<To be continued in another post>
 

Attachments

  • savingautosave.jpg
    EXIF
    savingautosave.jpg
    24.7 KB · Views: 3
  • DSSdonesmall.jpg
    EXIF
    DSSdonesmall.jpg
    134.7 KB · Views: 3
  • FDRTOOLS.jpg
    EXIF
    FDRTOOLS.jpg
    45.1 KB · Views: 4
Step 9:

Now let's see what we have. Open the 16 bit version of Autosave.tif in photoshop:

View attachment 1450

Oops, if you look where the worst dust particles were, there are now bright versions in their place:

View attachment 1451

This is because the monochrome Flat Frame is over correcting. The solution is to return back to Step 4, repeat the adjustments, and this time lower the Contrast. For these images, the initial contrast setting was +1.3. On my second pass, I reduced this to -1.8 and this is the result:

View attachment 1452

and Great, now the dust is dark, but not as dark as it was originally:

View attachment 1453

That means that a contrast setting between +1.3 and -1.8 on the Flat Frame will be able to null out the noise. Apart from this trial, test, and hunting for an effective contrast value that is the process.

It turns out that the ideal Flat Frame contrast was -1.1 but I also had to switch from a Light Frame with a 2 Second exposure to another Light Frame that I shot at .5 Seconds. As you can see from these examples, the Flat Frame compensation brightens the resulting image and I've found that it's best to shoot with the histogram shifted to the left, slightly under exposed so that bright highlights, the East facing white wall in this example photo, don't get blown out when DSS applies the Flat Frame.

All that remains is to increase the color saturation to match the original scene:

View attachment 1454

Look Close! The big chunks of dirt still leave artifacts, but the rest is gone.
 

Attachments

  • Autosave16small.jpg
    EXIF
    Autosave16small.jpg
    389.5 KB · Views: 7
  • Autosave16smallmarked.jpg
    EXIF
    Autosave16smallmarked.jpg
    81.2 KB · Views: 6
  • Autosave00116small.jpg
    EXIF
    Autosave00116small.jpg
    363.9 KB · Views: 2
  • Autosave00116smallmarked.jpg
    EXIF
    Autosave00116smallmarked.jpg
    79.1 KB · Views: 3
  • Autosave00716s.jpg
    EXIF
    Autosave00716s.jpg
    294.7 KB · Views: 5
Hi Steaphany,
that´s a lot of work you´ve done in providing this tutorial.
Excellent, and easy to follow.
But for me it leaves the question:
Wouldn´t it be easier to clean the sensor regularly to avoid that amount of dust?
Or did I miss something?
Regards
Uwe
 
Thanks for the info and tutorial Steaphany!
Can you just use the same Flat file for other images in different light if you haven't yet cleaned the image sensor? Or do you have to take new Flat files in the same lighting in order to use them?

Uwe, I think this would be easier if you're already taking pictures. Unless you clean your camera before and after every use. And for beginners like me who haven't fully understood the process of cleaning this gives us another option to try.
 
akv,

Yes, you can save your Flat Frames to use with later shoots. Just keep in mind that any new dust particles that were not recorded in the Flat Frame would not be corrected.

If you have a Flat Frame that you use with a specific lens to compensate for vignetting, then the urgency to shoot one for every photo session decreases. For example, I have a flat frame set aside and ready to vignette compensate when ever I shoot through my Orion 90mm Ø 1250mm Maksutov Cassegrain telescope, since, unlike dust, the vignette is static.
 
Thanks Steaphany,
I've noticed more dust spots on my images today, so it may soon be time for me to give the sensor cleaning a go.
 
Back
Top