DPR Forum

Welcome to the Friendly Aisles!
DPRF is a spin-off of dpreview. We are a photography forum with people from all over the world freely sharing their knowledge and love of photography. Everybody is welcome, from beginners to the experienced professional. From smartphone to Medium Format.

DPRF is a community for everybody, every brand and every sensor format. Digital and film.
Enjoy this modern, easy to use software. Look also at our Reviews & Gallery!

Silver Efex Pro B&W Conversions

If you use a Mac, You might like to compare RPP (Raw Photo Processor) for conversion. The colour sliders and tone controls are delicate and you can get about any B&W effect you want. RPP uses floating-point math so it cannot compete for speed but it surpasses anything else for tone.
However, is it not cheating to digitally simulate the noble limitations of traditional B&W?
 
No cheating

I would not call it cheating , because for those , who shoot digitally only , there is no other way , than using a B/W converter software , no matter which software brand . (except the only monochrome digital back available)

I was shooting B/W film for more than 40 years and developed all films , 6x6 and LF 4x5 inches myself and did my own prints up to 60x80 cm .
Since a couple of years I shoot digital only and have discovered color , and was fascinated by color .
Now I have come to a point , where I feel a kind of return to the roots .
(my roots :))

I think , we should not fall into a competition between the different B/W converters but rather enjoy B/W again and learn of each other , how to create good B/W images .

There are currently running two threads with the B/W topic . How could we get these two together not to dissipate the ideas and contributions ? ? ?
 
Nik Silver Efex Pro-2

Hi all, I've been working with this program for some time now. Have converted maybe 3 or 4 thousand digital images with it (probably more) ... I do a LOT of B&W wedding images, so you get pretty familiar and fast with any program that way. If I had to do this many individual conversions in PS alone it would take forever, and probably not look as good ... better I should kill myself ... LOL!

I have it loaded into the filters section of PSCS5, and into Lightroom 3. The difference is that with PSCS5 it produces layers, and when used directly in LR it does not make layers.

PS layers allows you to decrease the opacity of the B&W Nik layer as an overlay on the full color original to produce muted color effect, or to run Nik twice or three times concentrating on certain tonal areas, then blending the layers. So for quick conversions, I use it in LR, and for more extensive work, I use the "open in PS" option in LR, then open the file in Nik to work with PS layers.

Here's a demo of a portrait titled "Angry Man" shot with a H3D-II/31 ISO 800 @ 1/60, HC-150 @ f/4.5 ... in this case converted in PSCS5 using layers.

I've shown three finished shots: the original color ... a layered one showing a 30% Nik B&W overlay ... and the full Nik B&W conversion.

The three screen grabs show my general B&W work flow while in Nik Silver Efex Pro-2:

Window 1 shows an initial selection of a preset located on the left side ... in this case, "Fine Art". You can click on any of these to see the effect real time. (My most used preset by far is Push Process-1.) IF one of these presets doesn't work, I then explore the film types on the right side dialog window (Red Arrow). I almost always further modify either the Preset or the Film Type.

Window 2 shows the further modifications to the Fine Art preset that I had chosen. These are all located at the top>down in that right side dialog window starting with Global adjustments. In this case I increased the structure a little, hardened the grain, and lowered the yellow sensitivity to hold the camera right side of the face. In addition, I then did local adjustments using the Control Point tool ... one of the most sophisticated local adjustment tools of any post program I've ever used, and is what really separates this program from PS, and many other ways of converting B&W. One adjustment is shown, but I did 4 different areas.

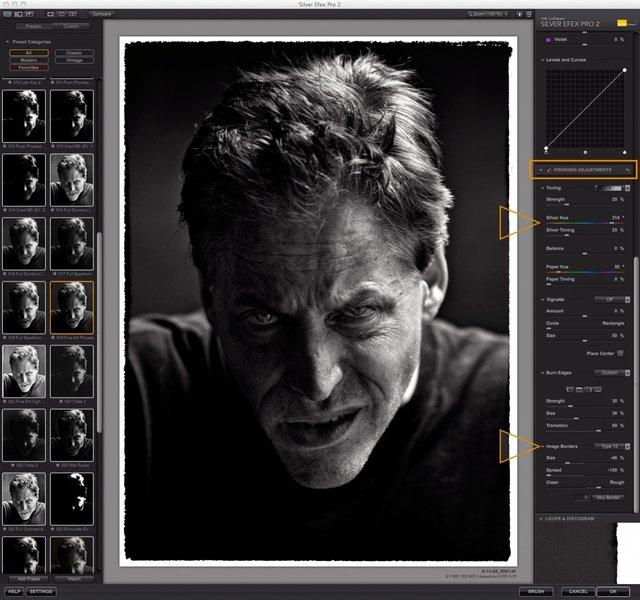
Window 3 shows the Finishing Adjustments done with tools located at the bottom of the right side dialog window. In this case I chose to adjust the silver toning a bit to simulate Selenium Toning, and then added an art border.

Sounds long when you write it all out, but only takes 5 minutes once you get the work flow down pat. That's because it is all right there in one window.

However, as with all software ... Practice makes Prefect : -)

Questions?

-Marc
 

Attachments

  • Window-3.jpg
    EXIF
    Window-3.jpg
    536.6 KB · Views: 20
Thanks Marc! This is exactly the kind of information that many of us will be able to use, explore and put to work quickly. After applying the presets from the left side of the window (I had mistakenly called them filters), I wasn't quite sure what to try next. I can't wait to give some of your workflow tips a try now. I do all my processing in PS, so I'm also interested to learn about changing the opacity of the layers.

Gary
 
I've never done it (adjust opacity of the layers) before, so if you have the time to show me/us how....yes, I would really appreciate that info too! Have to admit, I haven't worked with layers much at all.....only to apply contrast curves in B&W images.

Gary
 
Well, I just discovered that I can't take a screen shot of the layers pallet, so I'll just have to walk you through it.

1) Open a color file in PS. Go to Windows in the top menu, scroll down to Layers and click on it.

A small dialog window will open showing the file you just opened. There will be a little eyeball next to it.

2) Back to the open file ... if you have Nik, then do a conversion. When Nik is done, the open file will go B&W, and there will be a second B&W version of the file in the layers pallet. Click on the eyeball and the B&W overlay on the open file will disappear, click on/click off.

3) Now right above all that in the Layers Pallet are a couple of sliders. With BOTH eyeballs clicked on, select the B&W layer in the dialog box to highlight it. Now use the top slider to reduce the opacity of that layer.

Simple dimple.

You can do this with multiple different B&W conversions from Nik overlaying the same color file. Select individual files in the pallet, and you can work on just that layer ... even use the eraser to get rid of parts to let the layer below it show through.

When done, you can save it with layers or you can flatten the file as is by going to Layers in the top menu and scrolling to flatten file. Note all the other commands under Layers ... in some cases you can combine certain layers into one, and still have other layers separate.

There's a lot more, but that's enough for now, and good for a majority of applications.

Here's a quick example I did ...

The color version, the Nik B&W layer, then the Nik layer opacity reduced for an old photo sort of look.

-Marc
 

Attachments

  • 237-(3).jpg
    EXIF
    237-(3).jpg
    612 KB · Views: 13
Well, I just discovered that I can't take a screen shot of the layers pallet, so I'll just have to walk you through it.

1) Open a color file in PS. Go to Windows in the top menu, scroll down to Layers and click on it.

A small dialog window will open showing the file you just opened. There will be a little eyeball next to it.

2) Back to the open file ... if you have Nik, then do a conversion. When Nik is done, the open file will go B&W, and there will be a second B&W version of the file in the layers pallet. Click on the eyeball and the B&W overlay on the open file will disappear, click on/click off.

3) Now right above all that in the Layers Pallet are a couple of sliders. With BOTH eyeballs clicked on, select the B&W layer in the dialog box to highlight it. Now use the top slider to reduce the opacity of that layer.

Simple dimple.
-Marc


Thank you Marc

Simple dimple :) . . . . I have never done any correction to the opacity of any image .

but . . . . 3) Now right above all that in the Layers Pallet are a couple of sliders .

I can not find any slider there ! ! !
What am I missing here or what am I doing wrong or do we have to set an other option under the "window" list ? ? ?

jotloob
 
J, no opacity title with a box that says 100% at the top of the layers pallet at all? Try pressing F7.

What version of Photoshop are you using?

If you mean there is no slider, that is revealed by pressing the little arrow next to the 100% box ... you can use the slider or enter a percentage number in the box.

The opacity slider only works if you have made a layer. The original file shows in the pallet, but is NOT a layer, and is locked. BUT the Opacity tool should still be there just grayed out until you have made a layer.

Here's a video that shows the Layers Pallet.

http://www.youtube.com/watch?v=u2WYM5xCw2k

-Marc
 
Back
Top